All you have to do is simply follow this totally FREE, easy to understand, step-by-step process, and we guarantee you’ll have your own blog set up and running in LESS THAN AN HOUR !
Whether you are setting up your blog as a hobby, a business or as a way of generating some extra income, at the end of this step-by-step guide you will have your very own fully-functional Blog.
So let’s get right to it.
In order to have a successful blog there only really 5 things to get right from the very start:
- Decide the subject of your blog
- Choose A catchy personalized Domain Name which relates to your blog
- Choose a Hosting company for your blog
- Install a very simple free blogging software
- Learn how to fine tune you blog
Step 1: Register A Domain For Your Blog
At this stage it will be worth giving a little bit of thought to your own personal domain name. The reason being, a vast amount of people visiting your blog will generate their first impression on based on the name of your blog.
Some suggestions are as follows:
- Make sure the name is CATCHY
- Make sure it’s EASY TO REMEMBER
- Make sure it’s NICE AND SHORT
When someone uses Google to search for your blog subject, a blog that has the content in the domain with the exact words has a much bigger chance of appearing in the search results for that particular search. Also, users are more likely to click through to a website that has its name relevant to the phrase they were searching for.
Above all, make sure it has one of these extensions i.e .com, .org, or .net this is because your domain name will play a big role in the search engines.
For example, if your blog is a Wedding Blog, then something like www.myweddingblog.com would be a very good name to own.
OK, now let’s get started.
The first thing you will need to do is to decide who to use as your domain registrar. Personally we use and recommend Godaddy.com they are the worlds #1 domain registrar.
Now here’s why you’re at the right place, we at How To Start Your Own Blog have secured a DISCOUNT OFFER from Godaddy.com FOR YOU, a reader of this tutorial !
To take advantage of this DISCOUNT OFFER click here and you will be taken straight to the Discount Goddaddy Page. This is where you can search for available domains and purchase them at discounted rates.
The domain name search box will look like this:

Type in your ‘desired’ domain name and hit the Orange GO button to check if it is available! If it is then simply follow the on screen order process to register it. If the domain you want is not available, it means that someone else has already registered it, so you will need to try some variations of the name or thing of something else you like.
You may have to keep trying a few time for new names, as a lot of the good domain names are already registered. Most people prefer to use a .com extension, but you can also consider using one of the less popular .net or a .org extensions.
Follow the easy to understand registration process and you’ll be offered few different payment methods, you will also have an option to choose how long you wish to purchase the domain for. It’s up to you if you just want to register it for 1 year or longer.
You’ll also be offered various other add-on’s, such as: your country domain extension, privacy protection services, web hosting etc – it’s up to you if you want to buy any of these things, but for this tutorial we are just going to stick with the basics. So we usually just decline any of these extras and just buy the domain for around $8.
GODADDY is a great reliable domain register, and although they do offer web hosting, I prefer to use a separate company for web hosting.
I’ll explain the reasons behind this in the next step.
Once you’re done registering and purchasing your domain name, Godaddy will email your receipt, your log-in details,and other important information. SAVE THIS EMAIL, you will need your log-in details for Step 3.
Congratulations! You are now a proud owner of your own domain!
Now let’s walk you through the next simple step which is how to host your blog.
Step 2: Setup A Web Host Account For Your Blog
OK now that you are the owner of your very own domain name, lets get it on the internet and start your very own BLOG!
So how do you choose a good hosting provider? Well after years of experience, I have a couple of simple suggestions I want you to consider when making this decision. The first is simply avoid cheap tacky offers when it comes to price, the second, simply choose an established host provider with a very good reputation.
If you look around a little, you will find tons of hosts offering incredibly low pricing, but is it really worth it? Well, if you want your blog to always run smoothly, NOT to have large periods of down-time, then the answer is a resounding NO ! it’s definitely not worth it.
We would like to suggest a reasonably priced, well established hosting service called Hostgator.com
Hostgator has been around for many years and has a fantastic reputation of being RELIABLE, FAST and VERY CUSTOMER FRIENDLY.
Hostgator also offer UMLIMITED BANDWIDTH and more importantly, they are in a position to offer you UNLIMITED DISK SPACE (which enables you to have the capacity to handle very large traffic support if or when your blog grows BIG)
Setting up your Blog Web Hosting account with Hostgator is as easy as ABC and, like Godday we have secured a 25% DISCOUNT OFFER special deal from HOSTGATOR which again, is AVAILABLE TO YOU RIGHT NOW!
So take advantage of this amazing deal click on this coupon below and lets get your blog up and running right now.

When you arrive at their site, you will notice a big VIEW WEB HOSTING PLANS button right in front of you. Click on it.

Since you only have the one domain, you will want to select a ‘Hatchling Plan’ the one on the left.

Choose how long you wish to use their service for in the drop down menu, and then hit Order Now!
Next, you’ll be asked if you wish to choose a Domain or use an existing one. Since you have already registered a domain name with GODADDY, choose STEP 2 an existing one:

Enter the domain name you’ve purchased and press Continue to Step 2
Then Simply fill in the account and billing information, and hit Create Account!
Your hosting plan will become active and ready for use as soon as it is processed and configured (this usually takes up to 1 hour).
Once it becomes live Hostgator will send you an e-mail confirming this and they will give you some very important information. They will send you your LOG IN information details, and your personalized NAME SERVERS. Later on you will need both of these in order to link up your domain, so please don’t loose them, keep them in a safe place.
* I suggest making a couple of folders in your email account, one called ‘Godaddy’ – one called ‘Hostgator’ that way any emails from these companies can but save in these folders.*
There you go, you’re all done, you have just completed Steps 1 & 2 (the domain name and the hosting service),
That wasn’t that hard was it. So now lets go to the next step, show you how to link them both together ! Lets go to Step 3
Step 3: Connect Your Domain & Web Host
OK here we go, were on a roll now aren’t we. This next step is really very simple, however, too many people worry about it. The most common reason for this fear is because you’ll be doing what you consider “something Technical” You’ll be setting something up all by your self. It’s really nothing to be scared of, all you’ll be doing is changing things like name services, DNS, etc. And, while you have to do that, it’s much easier than you can imagine. Besides, we’re going to walk you through this process, so DON’T WORRY!
So lets have a look how easy it is to actually guide your domain to point towards your web host?
First, go to www.godaddy.com (remember, they are your domain providers)
Next you will need to log in. Your Log-In details were emailed to you by Godaddy.com

When you are logged into your Godaddy account, hover your mouse over “All Products” then “Domains” Then click “Domain Management” (See Below)

Next you will see a list of your domain names (which will probably just have 1 domain in it)
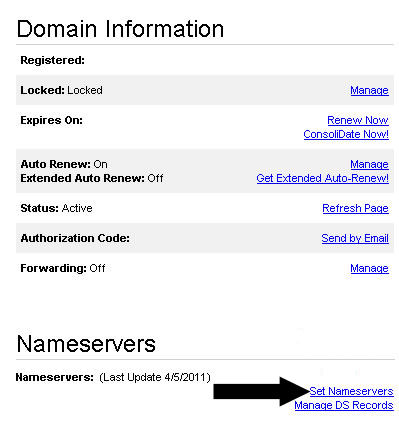
Click on your domain name and you will see the Domain Information details section on the left column.
Click on SET NAMESERVERS
From there you will be taken to this screen.
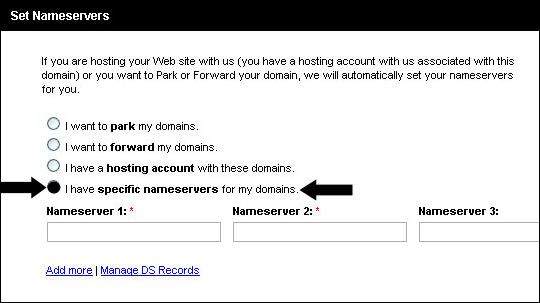
Select ‘I have specific nameservers for my domains’. Where it says Nameserver1 and Nameserver2 I want you to type in the information you were sent from Hostagtor when you ordered your web hosting plan from them . Do not put anything in the other two, just leave then empty.
* It’s very important to type in the nameserver exactly, so it may be worth cutting and pasting it directly from that email, and don’t worry about them being upper or lowercase, they will default when you put then in*
You can find this information enclosed in the e-mail you received from Hostgator when you ordered the hosting service.
Click OK to confirm. Changes will usually take around 2 hours for this to take effect however, though sometimes it can take a little longer .
Congratulations !– you have just successfully linked a GoDaddy domain to a Hostgator hosting account!
Well DONE you’re more that half way through!
In the very unlikely event that you have some problems, do feel free to contact the Godaddy help staff and ask for assistance. They have great customer support and will be very willing to assist you when any queries or questions.
Lets move on to Step 4
Step 4: Install WordPress On Your Domain
 Why should you have WordPress on your blog-site? WordPress is a free platform bloggers commonly used for several years. In essence, it allows you to START A BLOG with absolute ease.
WordPress is the most user-friendly, extremely customizable and a powerful tool when you’re creating a website,and IT’S TOTALLY FREE !
WordPress allows you to utilize the free pre-designed themes. You don’t have to spend your money hiring expensive web designers to get the site looking professional.
WordPress is incredibly user friendly when it comes to search engine optimization (also known as SEO). You’ll be able to install third-party plug-ins like the popular “All-in-one SEO”, which will boost the website’s visibility and more.
NOW Remember earlier I said I’d explain why we recommend Hostgatoer, well here’s why.
Manually installing WordPress on your website can not only be very difficult, it can also be very time consuming, especially if you’re not technically minded or have never manually installed it before.
This is why we recommended you use Hostgator. Hostgator has got a BUILT IN WordPress installer. Just one click and it’s all ready for you to use.
The WordPress feature comes with each Hostgator hosting plan. So, Let’s do it, let’s install WordPress using Hostgator auto-installer in 6 easy tiny steps?
1. Your Godaddy domain should already be pointed toward the Hostgator Nameservers (discussed in the previous step). With that in mind, type in: www.yourwebsite.com/cpanel
2, Hostgator will have sent you your LOG-IN information for the Hostgator cpanel in the email they sent you when you purchased the Hostgator web hosting Hatchling plan.
3. Scroll down to find the Fantastico De Luxe under the category Software/Services and click on it.

You will then see this screen. Click on WORD PRESS

4. Then you will be taken to this screen. Click on NEW INSTALLATION
On the next screen (below) you’ll be required to type in specific information like your email address, chosen WordPress username and password among many other things.
ATTENTION: where you see “Install in Directory” - LEAVE THIS BLANK - DO NOT PUT ANYTHING IN THIS BOX.
5. Press the “Install WordPress” button.
The next page will give you your Mysql username and access URL.
While you won’t need it right away, you should save it for later on.
Once your clicked Install WordPress simply Press “Finish Installation”.
CONGRATULATIONS! You’ve now have successfully installed WordPress onto your blog. The WordPress default “twenty-ten” theme can easily be changed once you’ve gained entrance back into the site. There are lot’s to choose from, and they’re all free.
All that’s left for you to do now is fine tune you blog. This is the final step and it’s very easy. In Step5 we’ll show you how to log in to the back end of your blog site and change the appearance of it. Here you can learn how to customize your blog so it looks just the way you want it to to the rest of the blog reading world.
Step 5: How to Fine Tune Your New Blog
OK so lets have a look at how to organize you blog. First you’ll need to log in to the back end of your blog site, to do is type in: /wp-login to the main URL and log into the site using the information you just put up.
For example: www.yourwebsite.com/wp-login
You can also login with the “login” link on your homepage.
Once you have access, you will see the default theme installed for your blog.
On the left hand side you will see your quick-links to pages, posts, tags, comments and category and change your WordPress theme.

Now will be the time to become familiar with the Dashboard as this is how you control your site.
You will see all the sub-menus on the left hand side of the screen. While they all play an important role, it isn’t something you have to learn fully straight away. The first thing to spend you time on is familiarizing your self with the menu’s below.
Here is a brief description for you to help keep it simple.
Posts
This is what you will use to “post’ on your blog. When you create posts inside WordPress, you can choose the page they’ll be displayed on, the date you publish them, the name of the publisher, and the option to give your blog visitors the ability to post comment on your posts. You will also be able to set up diverse post categories.
Media
The media menu allows you to manage your videos and pictures that you place on your blog.
Links
In the link section, you can generate a variety of different links and link categories you can use later on to create customized sidebar widgets.
Pages
you’ll use this to add fresh new pages to your blog. You can browse the different options available; enabling/disabling comments, page slug, altering page order, adjusting the page template etc.
Appearance
The appearance section allows you to customize the way you blog will look, beginning with the theme you have chosen, to the menus and sidebar widgets. There are lots of ways to customize your blogs appearance, so have a play around; you’ll be very pleased with what you can do.
Plugins
Plugins are useful tools if they are applied correctly. There are lots of different third party plugins out there that will allow you to speed the performance of your blog, boost visibility of the website on search engines, improve the visual style and look, etc.
Users
This part is for the addition or modification of the existing user settings like profiles, passwords, emails, etc.
Settings
The setting menu allows you to set up things like your blog name, media settings, the front page display, the date format, and the descriptions. From the settings menu, you can also reconfigure any third party plugins you install.
Follow the 5 steps above and you will have your blog set up and running in no time at all. You can then start your blog right now by adding your very own content and posts. You can also give more thought to the theme that you may wish to install if you don’t want to use the default theme. If after you’ve gone through the 5 steps you feel you still need more just send us a message through the contact us page and we’ll be very pleased to point you in the right direction.
Happy Blogging.